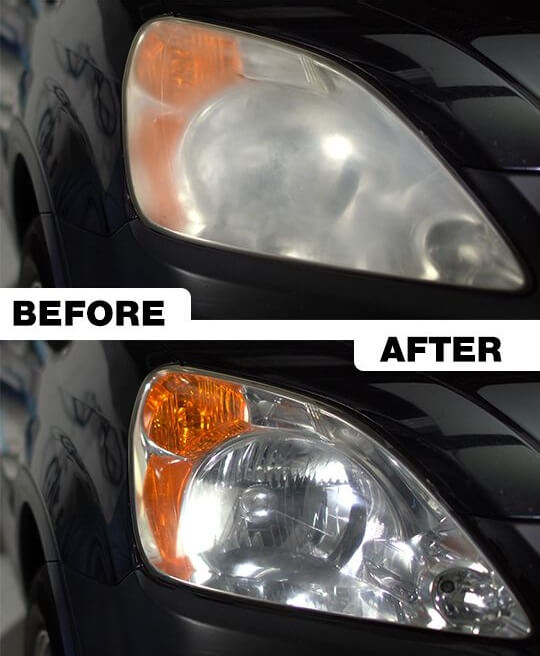
Are you tired of driving with hazy headlights? Learn how to remove haze from inside headlights in 5 simple steps. Say goodbye to cloudy headlights and improve your visibility on the road.
Do you have hazy or foggy headlights affecting your driving visibility? If yes, don’t worry too much; you’re not alone, and we have an excellent solution!
Having clear and bright headlights is crucial for safe driving, and hazy or foggy headlights can compromise your safety. But the good news is that removing haze from inside your headlights is easy and can be done in just a few simple steps.
In this comprehensive guide, we have listed step-by-step instructions on how to remove haze from inside headlights using a high-quality headlight lens restorer kit that is safe, effective, easy to use, and provides long-lasting results at an affordable price point.

To clean foggy headlights from the inside, no one should spend a lot of money on professional headlight restoration services or headlight replacements.
Just follow the step-by-step process explained below, and you will be able to restore your headlights to their former glory without breaking the bank.
So if you’re ready to take matters into your own hands and restore your headlights to their former clarity, let’s check out why do headlights get foggy inside and how to clean foggy headlights from the inside.
What Causes Headlights to Get Hazy Inside?
Headlights keep getting dirty all the time, and it’s easy to clean them from the outside, but what about the inside? Do you know it’s not safe to drive a car with hazy headlights as it reduces visibility to a great extent? When you drive at night or in the rain, you can clearly understand how hazy or foggy headlights impact your vision and clarity of the road.
You keep asking yourself – why do my headlights get foggy inside? There are several factors which lead to hazy headlights, which are listed here:
- If your car spends too much time in the moisture, the mist seeps in and blur the vision. Say your car’s headlights get foggy after a car wash or a long drive in the rain. Though they come with a watertight seal, the seal breaks over time, and water starts sinking in, causing the haziness.
- The dirt and dust keep getting inside. Over the years, it creates a film or damages the protective layer, making your headlights foggy.
- As you drive the car, your headlights and the car front is attacked by road salt, debris, and gravel. It causes scratches on headlights turning them foggy and hazy.
- Car headlights come with a top coating to cover them from UV lighting, but wear and tear to the car also takes its toll on headlights and eventually, sunlight paints them yellow.
Now, if you are wondering how to remove haze from inside headlights, here you go. This guide covers removing haze from inside headlights in five easy steps.
Must check: 13 Best Car Headlights for Night Driving in 2023 and My #1 Pick is…
How to Remove Haze from Inside Headlights in 5 Simple Steps
When you buy a new car, the headlights are shiny and bright. They are the beauty of your vehicle. But over time, they turn hazy as your cleaning efforts can only clean them from the outside. But driving with hazy headlights is a major risk because they reduce your vision.
So, if you need clarification about how to clean the inside of a sealed headlight, here are the five most straightforward steps to keep haze away from your headlights. Just follow through.
Step (1): Remove the Headlight Housing from the Vehicle
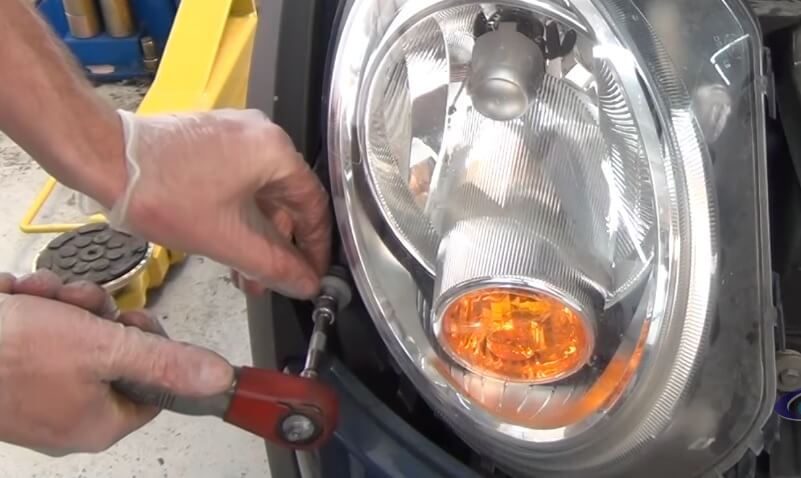
This is the first step in car headlight restoration. You want to clean headlights from the inside, so you have to open them. Look at your headlights. Are they covered with a chrome trim or a metal trim? If yes? Then you must remove this trim. All you need is a screwdriver to remove this trim.
The Pozidriv Screwdriver Set with dual material handles is the perfect tool for all the basic tasks. Its non-slip black oxide tip fits perfectly and doesn’t move unnecessarily, causing injuries. But if want a professional-grade mechanic tool set then you can go for DEKOPRO Socket Wrench Auto Repair Tool (228 Piece) that comes with pliers, screwdrivers, sockets, wrenches and toolbox storage case.

Now look for the mounting screws and remove them gently. Don’t aim for the aiming screws. The aiming screws are not to be tampered with. After you unscrew the mounting screws, you can gently pull out the headlight housing.
Step (2): Spray the Screws Before Opening
It’s not only about cars; if you are opening up screws on anything after a long time, spraying the screws to loosen them is always recommended. When you are starting with your headlights, you must spray them with a penetrating solvent.
You can also use oil or grease, which reduces the friction. If you apply unnecessary force on stuck screws, they widen the screw holes and later become hard to deal with.
You can use Gasoila’s Free All Rust Eater Deep Penetrating Oil. It is a multipurpose oil which is fit for many purposes. It penetrates rust, scale, and corrosion and easily loosens grease, graphite, and carbon deposits. It comes in various sizes so that you can buy one as per your need. It is the best penetrating solvent in the market presently. Just spray it on the affected area and then slowly unscrew the screws.
It will detach your headlight, but you can see the wiring. It is recommended that you turn off the engine. Also, disengage the electrical wiring to detach the headlights completely from the car.
It is important to avoid any electric shock. If this is your first time opening a headlight, you can write down the wiring connections to make assembly easier. No begins the process of cleaning the oxidation inside the headlight.
Step (3): Clean Your Car Headlights Thoroughly
People use different methods for cleaning inside headlights. Some use soap, others use detergent, and some use a methanol bath for their headlights. All methods are discussed here.
The first one is to use an automotive soap. You can choose Mr. Pink Foaming Car Wash Soap. This gentle chemical is known for its foam, which creates loads of thick bubbles. Also, it has a candy scent, so you will not feel like you are standing in a car wash service. Also, it can be used with a bucket, foam gun or cannon.
You can also take your scrub, splash some Mr. Pink car wash soap on it, and start scrubbing your headlights. Once they are thoroughly rubbed, rinse them and see if any debris or dirt is left. If required, sponge again.
Apart from this, you can also use mild dish soap, but it is recommended only if you don’t want to invest in an automotive soap. They are best for your cars, but the choice is yours. You can create a solution in the bucket or sink and submerge the headlight lenses in them.
The water will loosen the dirt, grime, and condensation. Let it soak for a while. Now, use a gentle scrub, and remove everything. You can also use a gentle brush, but ensure that it is soft, or else it will scratch the lenses.
Methanol wash is last on the list. If you are a beginner, you are not recommended to try it at all. Methanol is highly flammable, and thus, it needs the expertise to use it. Try the suitable ways mentioned above to clean your headlights thoroughly.
After washing, pat dry your lenses with a soft, lint-free cloth. Allow them to dry completely before moving on to the next step.
Step (4): Apply a High-Quality Headlight Lens Restorer
The fourth step of car headlight restoration is using a headlight lens restorer. You will need a restoration kit to complete the process. You can go for the 3M Headlight Lens Restoration System or SYLVANIA Headlight Restoration Kit.
The 3M Headlight Restoration Kit has a 3M disc pad holder, 6 gold sanding discs, 4 white finishing discs, 1 gray finishing disc, a compounding pad, and a rubbing compound. And the Sylvania restoration kit comes with a surface activator, sand grits, and UV Block Clear Coat Applicator.
Further cleaning depends on the restoration kit that you choose. With a 3M Headlight Lens Restoration Kit, you can use the regular household drill and attach sandpaper to scrub all the oxidation. Then wipe it off with a towel or paper towel. Use the recommended grit finishing disc and rub the headlight lenses. Then take the rubbing compound and apply it to the lenses with the help of a compounding pad.
The SYLVANIA Headlight Restoration Kit restores your headlight’s beauty in three simple steps. Apply the activator and let it sit for less than a minute. Use the recommended grit sandpaper, and remove the unwanted grime and dust. Apply more activators if needed. Rinse it. Lastly, apply the UV Block Clear Coat and finish it off. Keep them dry for at least an hour.
Step (5): Reassemble and Reinstall the Headlights
Once it’s done, you can reassemble your headlights. First, have a look at the wiring. If you had written it down, it would have been perfect. Connect the wires. If your socket connectors need cleaning, apply an electrical contact cleaner.
Now, fix the headlights in their places and align them with screw holes. Fit the aiming screws, and cover the headlights with metal or chrome trims and bezels.

How to Clean Foggy Headlights from the Inside – Author’s View
Some of the most effective and best ways to remove haze from headlights are shared above. The method is pretty simple. All you need to do is to follow the steps. But the most important is to keep your tools ready. If you are a beginner, opening a headlight lens is a difficult task. It would be best if you had all the tools required to do it, such as the Pozidriv Screwdriver set, which is ideal for the task.
While cleaning inside headlights, it is essential that you don’t damage any parts. The car’s aesthetic value is affected even by the smallest damaged parts. A good penetrating spray ensures that it gets past rust and corrosion and doesn’t damage the screw holes. You can choose Gasoila’s Free All without any doubt.
When it comes to cleaning the headlight lenses, it is always recommended to use an automotive soap or car wash. Not only Mr. Pink Foaming Car Wash Soap but instead of using dish wash bars or detergent, go for a high quality car wash soap.
Headlight restoration kits are a great help in cleaning oxidation inside the headlight. Different kits come with various components to help you restore your headlight’s shiny and new look back.
Foggy headlights have several shortcomings. First, it creates a risk for you and other drivers on the road. Low visibility at night is very dangerous.
Secondly, if you plan on selling your car in the near future, it should look perfect, and foggy headlights can betray you, lowering the resale value of your vehicle.
Thus, cleaning the car headlights is essential. Now that you know how to clean car headlights from inside, ensure that your car’s aesthetics are not lost and that you keep it bright and shiny.
You may also be interested in checking out:
- 13 Best Night Vision Glasses for Driving Car at Night
- How to Make Car Seat More Comfortable for Long Distance Driving
- Can You Drive on a Flat Tire in an Emergency Situation?
- 8 Easy and Best Temporary Fix for Broken Car Window


